Temporal tables have been a feature of SQL Server since version 2016. SQL Server professionals have historically had several options to track data change events. The evolution of the data tracking mechanism started with Change tracking (CT), Change Data Capture (CDC) and now Temporal Tables.
Introduction
In my experience, I have seen that a few projects still use custom data tracking solutions. And in a few other enterprises, third-party solutions are in place to manage the same. In this article, we’ll discuss temporal tables in SQL Server 2016.
GDPR (General Data Protection Regulation)
As we all know, the General Data Protection Regulation (GDPR), a new data privacy regulatory act, introduces significant changes in the way organizations collect or use data. Enterprises must adhere to the data privacy and protection act.
- Note: A detailed explanation of GDPR concepts can be found in the article: Using production data for testing in a post GDPR world
To comply with GDPR requirements, organizations strive towards working with various tools and techniques.
SQL Server offers various native tools and techniques and is capable of fulfilling most of the security requirements for being GDPR complaint.
- Note: A detailed explanation of SQL Server Features that support GDPR compliance can be found in the article: SQL Server data security feature RLS (Row-Level Security) and GDPR
Getting Started
Let’s deep-dive into the concepts of temporal table and see what can be derived out of this feature.
What is Temporal Table?
Temporal tables, also known as system-versioned tables, provide us with new functionality to track data changes. It allows SQL Server to maintain and manage the history of the data in the table automatically. This feature provides a full history of every change made to the data.
It was first introduced in ANSI (American National Standards Institute) SQL 2011 standard. Now, it’s available in SQL Server 2016 and later versions.
Temporal tables are considered as one of the critical features used to audit SQL Server data.
The two period columns which are of datetime2 data type, SysStartTime and SysEndTime define the current and historical data for every row of the table. It defines the validity of the data. The DateTime range has a value that is appropriate during that timeframe. By querying the table, we can easily see the transitioning of the data to its various states within the specific date-time intervals.
Why Temporal tables?
The following are some usage scenarios of Temporal tables
- Auditing
- Rebuilding the data in case of inadvertent changes
- Projecting and reporting for historical trend analysis
- Protecting the data in case of accidental data loss
Demo
Let’s jump in to get started with the demonstration.
The following example creates an employee temporal table created with a few sample rows.
| CREATE TABLE dbo.employee( EMPNO INT, ENAME VARCHAR(10), JOB VARCHAR(9), MGR INT, HIREDATE DATE, SAL NUMERIC(7,2), COMM NUMERIC(7,2), DEPTNO INT, CONSTRAINT EMP_PK PRIMARY KEY (EMPNO), SysStartTime datetime2 GENERATED ALWAYS AS ROW START NOT NULL ,SysEndTime datetime2 GENERATED ALWAYS AS ROW END NOT NULL ,PERIOD FOR SYSTEM_TIME (SysStartTime,SysEndTime)) WITH (SYSTEM_VERSIONING = ON); |
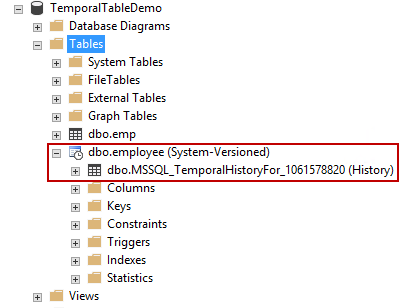
By default, the SQL Server will automatically generate a name for the history table in the following format
dbo.MSSQL_TemporalHistoryFor_<ObjectID>.
If you browse the table, we can see the absence of “Delete” option for Temporal Tables properties.
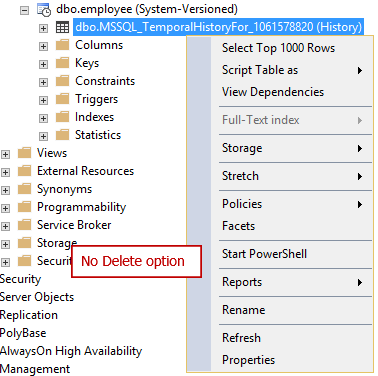
To get the delete option, first, turn off the system_versioning setting using the alter table statement. After that, you’ll notice that the tables, temporal table and history table become a regular table.
You can also use the SSMS generate script option to drop the temporal table.
| ALTER TABLE [dbo].employee SET ( SYSTEM_VERSIONING = OFF )GO |
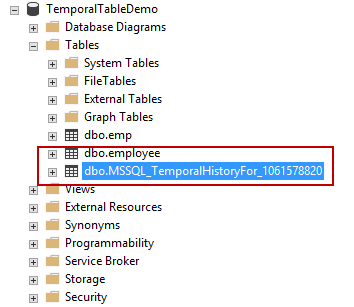
Now, the tables can be dropped either by using T-SQL or SSMS.
How to Create a Custom Name for Temporal History table
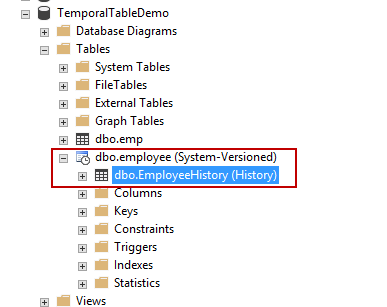
In this section, we’ll see how to create a custom temporal table along with a consistency checker option. In this case, the employeeHistory is the history table and DATA_CONSISTENCY_CHECK=ON is used with the WITH clause of the create table statement.
The create table statement is discussed in detail here.
In the following output, we can see that the custom history table dbo.EmployeeHistory is created as part of the Create table statement.
Insert a few records into the employee table
Query the employee table
| 1 | select * from employee; |
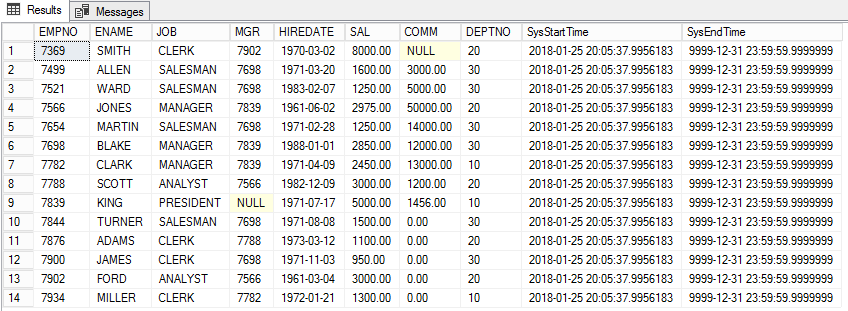
Now, If you want to hide the SysStartTime and SysEndTime columns from viewing, add a hidden keyword in the create table statement so that the column does not show up in a select query.
| CREATE TABLE dbo.employee( EMPNO INT, ENAME VARCHAR(10), JOB VARCHAR(9), MGR INT, HIREDATE DATE, SAL NUMERIC(7,2), COMM NUMERIC(7,2), DEPTNO INT, CONSTRAINT EMP_PK PRIMARY KEY (EMPNO), SysStartTime datetime2 GENERATED ALWAYS AS ROW START HIDDEN NOT NULL ,SysEndTime datetime2 GENERATED ALWAYS AS ROW END HIDDEN NOT NULL ,PERIOD FOR SYSTEM_TIME (SysStartTime,SysEndTime)) WITH (SYSTEM_VERSIONING = ON (HISTORY_TABLE = dbo.EmployeeHistory, DATA_CONSISTENCY_CHECK = ON)); |
Let us perform SQL Update DML operations to understand the usage of SYSTEM_TIME column.
For example, SMITH’s salary has got an increment of 2000. The update SQL is as follows.
| 12345 | UPDATE EMPLOYEESET SAL=SAL+2000WHERE EMPNO=7369SELECT * FROM EMPLOYEE WHERE EMPNO=7369 |

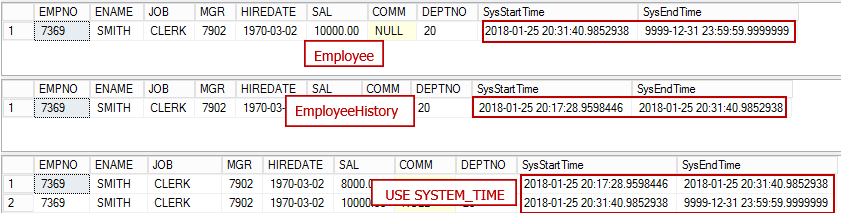
After the update, we can see that the Salary column is updated. The column SysEndTime is a reference pointer to indicate the active record of the table. It’s really easy to audit the data flow by referring the SysStartTime and SysEndTime.
| SELECT *, SysStartTime,SysEndTime FROM EMPLOYEE WHERE EMPNO=7369SELECT * FROM EmployeeHistory WHERE EMPNO=7369SELECT *, SysStartTime,SysEndTime FROM EMPLOYEE FOR SYSTEM_TIME ALLorder by empno, SysEndTime |
The SysEndTime ‘9999-12-31 23:59:59.9999999’ always refers to the active record set. The dbo.emplyeehistory table has the previous reference pointers of the modified data. In this case, the column, salary, is seen as updated on “2018-01-25 20:31:40.9852938”. The unmodified record made an entry into the history table with the updated timestamp. The updated timestamp becomes the SysStartTime column of the modified record.
The entire update process can be easily traced by referring the Sys columns that is arranged in a Zig-Zag manner.
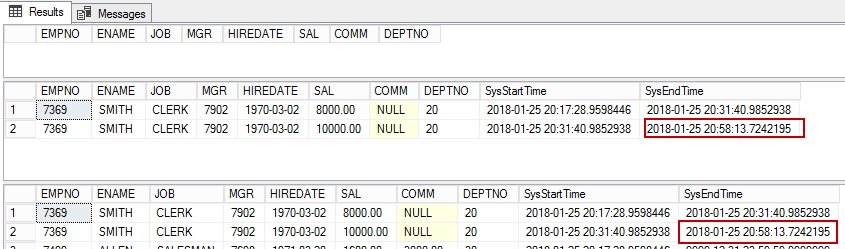
Now, Let us perform the SQL Delete operation to delete the employee record 7369 and see what happens
| DELETE from EMPLOYEE WHERE EMPNO=7369SELECT * FROM Employee WHERE EMPNO=7369SELECT * FROM EmployeeHistory WHERE EMPNO=7369SELECT *, SysStartTime,SysEndTime FROM EMPLOYEE FOR SYSTEM_TIME ALLorder by empno, SysEndTime |
The output is an empty result set. The SysEndTime is updated with the timestamp of DELETE statement. This indicates that the record was deleted from the table.
>
The FOR SYSTEM_TIME clause has many variations and options. It is further classified into four temporal sub-clauses. This provides a way to query the data across current and history tables.
- AS OF <datetime>
- FROM <startdatetime> TO <enddatetime>
- BETWEEN <startdatetime> AND <enddatetime>
- CONTAINED IN (<startdatetime> , <enddatetime>)
- ALL
The AS OF clause is used when there is a need to rebuild the original state of the data and need to know the state it was at any specific time in the past. This is possible by specifying the date time as its input.
| SELECT *, [SysStartTime],[SysEndTime] FROM [dbo].EMPLOYEE FOR SYSTEM_TIME AS OF ‘2018-01-25 20:17:28.9598446’ WHERE EMPNO=7369 |
Here are some other sub-clause temporal options that are useful for data audit.
| SELECT * ,SysStartTime,SysEndTime FROM EMPLOYEEFOR SYSTEM_TIME BETWEEN ‘2018-01-25 20:17:28.9598446’ AND ‘2018-01-25 20:58:13.7242195’;SELECT * ,SysStartTime,SysEndTime FROM EMPLOYEEFOR SYSTEM_TIME CONTAINED IN(‘2018-01-25′,’2018-01-26’)SELECT *, SysStartTime,SysEndTime FROM EMPLOYEE FOR SYSTEM_TIME ALLorder by empno, SysEndTime |
Summary
In this article, we see the step-by-step procedures to setup temporal tables in SQL Server. Temporal Tables are generally useful in scenarios that require tracking the history of data changes. In some cases, it can be used to reconstruct the data. Its steps are pretty simple and straightforward. It doesn’t require writing triggers or stored procedures or any application code change. Data retrieval is made very simple using the SYSTEM_TIME clause along with the associated sub-clause.
The history table can grow big. It depends on the number of transactions on the temporal table so, space is the biggest tradeoff. You can consider purging the data from the history table.
